Difference between revisions of "Amor fati's Approach to Psychonautica"
(→Freebase Conversion: fixing transclusion) |
m (→Administration by Potentiation) |
||
| Line 20: | Line 20: | ||
== Administration by Potentiation == | == Administration by Potentiation == | ||
| − | + | {{:amor_fati's Guide to Mucosahuasca}} | |
= Trichocereus and Its Associated Molecules = | = Trichocereus and Its Associated Molecules = | ||
Revision as of 19:31, 5 March 2010
| Note: | This page serves as a compilation of amor_fati's approaches to various facets of psychonautica. The content is to remain accurate as such. |
| Note: | This page is a work in progress -- its content throughout is not yet complete. |
Contents
DMT and Other Associated Molecules
Extraction
The process of DMT extraction has always been a relatively simple and forgiving process and can be approached with a wide variety of methods and techniques for varying degrees of success and quality of product. Most of the more common time-tested techniques involve processes and materials resembling the production of other less savory substances, and often require large quantities of time, materials, strain, and space on the part of the operator. Perhaps the most concerning quality common to these techniques is the toxicity and other hazards inherent to the materials in use. However, less toxic and even completely nontoxic approaches have been in development for some time, now, and hope to usher in a new era of wholesome, food-grade extraction of psychedelic substances.
This approach hopes to establish a thorough and reliable nontoxic method of extraction to yield results comparable to those of its less wholesome ancestors.
Abstract
One of the most unfortunate realities of the extraction of DMT from whole MHRB, is the process of pulverization, as most households aren't equipped with the proper equipment to thoroughly pulverize the material into powder. Furthermore, the equipment most used for the task are either slightly expensive or prone to damage when used in this way--sometimes both. The inspiration behind the method of pulverization used here was one that seemed among the most noteworthy yet developed: The combination of a blender and a mason jar to perform the task carries the advantage of being able to contain all the source material reliably (to include the messy, potentially damaging dust produced in the process), and to contain it with the same vessel in which the first stages of extraction may be carried out. Drawing on this method of pulverization, this tek expands on it by making it more thorough and combining it with other portions of the extraction process.
The extraction portion of this process uses three vessels in which all stages of extraction will cycle through in order to reduce mess, loss of material, and loss of product. The bulk of the process will take place in a single vessel in which pulverization and basification will occur and in a rather automated fashion. Then all material will be transferred to a vessel in which washing, decanting, and filtration of the target solvent will all take place simultaneously. After passing through this vessel, the target solvent will be collected in another vessel. The process of the second and third vessels can then be repeated by pouring the solvent back into the first vessel, then back through the second. If unsatisfied with the results, the material can be transfered back into the first vessel and blended with more reagent.
Rendering product from the extraction involves salting by thoroughly mixing the solvent with acidic water and then separating the layers to collect the water from the bottom and reuse the solvent from the top. The collected solution can then be evaporated with heat and airflow to yield precipitates consisting of salted product and excess acid, which can be purified simply by dissolving the product in water, decanting and evaporating.
The process can take a relatively short amount of time, with the longest waiting periods being the process of preparing MHRB for pulverization, time for solvent to pass through the material, separation of the polar and non-polar layers, and evaporation. The reliability of this method of extraction is derived from its ability to render a homogeneous mixture of MHRB, lime, and water and allow that mixture to remain moist so that the reaction is ensured to go to completion.
Procedure
| Note: | Steps 3-4 may prove unnecessary and will be removed pending trial by experimentation. |
| Materials Required | |
|---|---|
Source Material:
|
|
Solvents:
|
|
Reagents/Desiccants:
|
|
Equipment:
|
 |  |
- Prepare MHRB for pulverization by breaking up by hand or any other method suitable.
- Add 100g MHRB to a regular-mouth quart mason jar.
- Attach blender blade assembly and pulverize contents thoroughly.
- Thoroughly moisten the bark with vinegar, replace the lid on the jar, and heat in a hot water bath below boiling.

- acid and heat treatment may aid in breaking down the material for extraction.
- Add 50-100g hydrated lime to the jar w/ sufficient amount of water to thoroughly moisten contents.
- Add an amount of limonene just short of filling the jar.
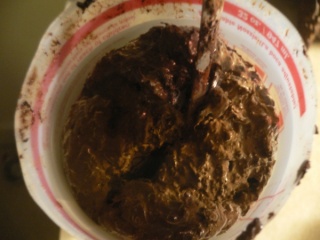
- Attach blender blade assembly and blend/pulverize contents thoroughly until of a doughy consistency.
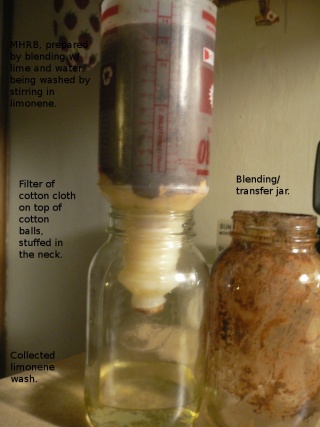
- Prepare The Herbal Percolator (THP) by cutting the bottom off a 32oz HDPE spray bottle, stuffing cotton balls in the neck loosely, and covering the nape of the neck with a few layers of cotton rag.
- Set the bottle in a clean regular mouth quart jar with the rim of the lid loosely screwed onto the the mouth to prevent a seal from forming between the bottle and the jar.
- remember to remove the rim prior to pouring out the collected limonene to avoid a mess.
- Pour the contents of the blending jar into THP and stir while allowing limonene to pass through into the collection jar.
- Continue to pass limonene through THP until satisfied, adding more if necessary.
- preferrably by pouring the limonene into the original blending jar and using it to wash any remenants into THP
- Prepare a saturated solution of a known amount of fumaric acid.
- referred to as 'FASW', or 'Fumaric Acid Saturated Water'.
- Combine FASW with the limonene used for extraction in a glass or HDPE jug and shake vigorously to mix thoroughly.
- Allow to separate and for emulsions to settle and pour into a separatory device.
- Collect bottom water layer for evaporation and top limonene layer for reuse or recycling.
- Evaporate using heat of no more than 120F and sufficient airflow and collect salt and acid precipitates.
- scraping the product off the dish can be difficult, so it is easier to scrape it into a pile while still wet, then continue to dry.
- comparison of the total weight to that of the known amount of fumaric acid should indicate amount of freebase product present.
- Purify the salted product by dissolving in water and decanting off of excess undissolved fumaric acid and evaporating.
- the coloration of the decanted solution should indicate the amount of product dissolved.
- Collect the dry, solid DMT Fumarate, and handle with care and sincerity.
- this product contains approximately 76% DMT freebase.


Notes Regarding the Extraction Process
- The use of only 100g MHRB per THP is recommended to avoid overflow in the process of stirring as well as damage to the blender, but more may be used if the operator see's fit; however, it is strongly recommended that no more than 150g be used at a time. If too much is used so that stirring is found difficult, an amount can be removed and simply kept in the blending jar and stirred in limonene between transfers.
- For multiple extractions to be performed at a time, it is recommended that the operator prepare the total amount of limonene to be used in the process and add to each as needed. When complete, the limonene can be collected and salted as a total amount.
- This process can theoretically be applied to other DMT-containing botanicals with only minor adjustments and even to the extraction of mescaline from dried cactus material with the use of a more appropriate acid.
Advantages
- Nontoxic and wholesome
- Requires only food-grade materials with little or no potential impact on health or the environment.
- The use of only household equipment and materials
- All items are readily available on the open market and are commonly found in the home.
- Minimal material demand
- Less material to handle and less cost than most other extraction teks, making the process of extraction and disposal of materials much less messy or risky.
- Potentially expedient
- The process may only require a day to perform, yielding adequate results, overnight.
- Simplified
- Many of the processes required for extraction have been combined and largely automated: Such as filtering and decanting, as well as mixing and pulverization.
- Effective use of whole MHRB
- Generally cheaper more readily available, also with less risk of vendor introduced impurities or premature oxidation of product.
Special Thanks
- To 69ron and Infundiblum for pioneering the use of fumaric acid in the refinement of DMT.[1][2]
- To 69ron for pioneering the use of lime and limonene for the purpose of extraction.
- apart the use of a blender, this tek is almost identical to SWIM's THP approach to 69ron's mescaline extraction tek[3] and not far off from 69ron's proposed technique for the nontoxic extraction of DMT.
- To Jorkest for pioneering the use of limonene and FASW in DMT extraction.[4]
- To Bufoman for developing a nontoxic, simple means of purifying DMT fumarate.[5]
- To the Nexian who developed the blender method of pulverizing MHRB.[6][7]
- To The Herbal Percolator for all its simplicity.
- And to The Traveler and the rest of the Nexus for making this possible.
Administration by Inspiration
Freebase Conversion
| Nontoxic Conversion of Full-Range Fumarate Extract of Jurema to Freebase w/ Hasty Manual Crystallization | |||||||||||||||||||
|---|---|---|---|---|---|---|---|---|---|---|---|---|---|---|---|---|---|---|---|
|


Material Preparation
| Conversion of Sodium Bicarbonate into Sodium Carbonate | ||||
|---|---|---|---|---|
 
|
Improvisation of Device for Vaporization
|
in·spi·ra·tor (ĭn'spə-rā'tər) n.
[From Late Latin, from inspirare 'to inspire' (from in- + spirare 'to breathe') + -tor; cognate with, and possibly derived via, English or German] |
|---|
The Inspirator was considered by its designer to be the criterion of efficiency for vaporizing spice, and to be a cheap and effective method of achieving sufficiently cool, full, measured doses. The device is inspired in part by The Machine but operates by convection heating--diffusing the heat through a ceramic heat-sink, in turn heating the airflow--rather than conduction. This design was the final evolution of The Mini-Machine Bubbler Stem, though has since been succeeded by The Inspirator mkII.
Procedure for Construction
| Note: | Though this design is thought to minimize the possibility of exposure, SuperWool 607 HT should be used for health considerations, as ceramic fiber can be hazardous to the repiratory system. |
| Materials Required | |
|---|---|
Equipment:
|
 |
 |

- Carefully crush the nozzle of the dropper stem with pliers, leaving a slight portion of the nozzle's curve.
- be sure to wash out any lingering pieces of glass.
- Melt the broken end of the stem with a torch so that the sharp edges are dulled and any cracks sealed.
- Cut a segment of ceramic fiber, and use a thin metal rod to stuff it down toward the nozzle-end snuggly, and so that a part of the ceramic is exposed out of the heat intake.
- Ensure that the screen to be used is heat resistant by applying direct flame with the torch, and if smoke emits, continue to burn until no more can be observed.
- alternatively, a small metal mesh plug can be prepared from steel or copper scrub-pad in the same manner.
- this is the absolute highest temperature this piece will ever reach and will remain inert while in use.
- After it has cooled, use a chopstick or another cylindrical device thin enough to fit the inside of the dropper stem to apply pressure to the center of the screen while bending the edges up and around the device to mold it into a form that will fit snuggly in the stem.
- Carefully push the screen as snuggly as possible atop the ceramic fiber plug in the piece, working edges down between the glass and the plug.
- Fit two gaskets on the stem far enough from the plug to avoid heat but far enough from the other end to provide a stable stem.
- alternatively and more cheaply, a small section of latex tubing could be rolled or folded into a ring around the stem to serve the same purpose.
Calibration
| for Calibrating Airflow | ||||
|---|---|---|---|---|
|
Administration.
| Use w/ Dry Freebase | ||||||
|---|---|---|---|---|---|---|
|


| Use w/ Acetate Tincture | ||||
|---|---|---|---|---|
|
Notes on Effective Use and Maintenance
| for Cleaning The Inspirator | |
|---|---|
|
Storage
To ensure that the inspirator is clean prior to every use, it can be stored in a dropper bottle filled with IPA.
- Ensure the absence of IPA in the piece prior to usage by heating, burning and blowing the residual solvent out of the piece.
 |
 |
 |
Further Tips
- Another handy method for storing the piece would be to cap the nozzle end with the dropper bulb in order to protect from breakage and keep track of the bulb to use when cleaning.
- A second gasket generally makes the piece safer to handle--especially if used as a pull stem--while the other provides a seal.
- For group sessions, it would be easiest to prepare an individual piece for each person so that dosage can be more easily regulated.
- When handling the piece after heating, handle by the gasket and avoid any part of the heated portion of the glass coming into any contact with hard surfaces.
- A good way to cool down a stem is to roll it rapidly between the palms, drawing the heat off the glass with one's hands.
- If the the nozzle end of the piece breaks off at any point, carefully push the plug to the other end of the piece when it has sufficiently cooled, heat the sharp edges until dulled, and push the plug back into place firmly, with a finger in place causing the plug to mushroom slightly until it fits snugly in place.
- Ensure adequate airflow through the piece by poking holes in the plug with a safety pin.
- Develop a relationship with the device.
Special Thanks
Administration by Potentiation
Juremala refers to a character and method of administration of spice, unique to that extracted from jurema, in which jurema extract is used in conjunction with harmaloids to achieve a duration of psychedelia. Most commonly, harmaloids may be administered sublingually to potentiate the effects of inspirated spice vapor or else orally to mimic the traditional methods of administering ayahuasca brews; however, the use of purified substances is a far-cry from crude traditional preparations, and so in achieving a more effective means of administration, alternative routes are available. One such route is sublingual administration, and while notoriously difficult, a few considerations and a bit of experience may help to enhance the consistency and effectiveness of this route well beyond what is possible by oral means.
One of the first considerations that may lead one to practice sublingual administration in lew of oral is that of the digestive tract. As one of the most reliably inconsistent factors in achieving or failing to achieve the desired effects of such administration, it may reasonably be subtracted when the goal is simply to absorb juremala into the bloodstream. It's often found with oral administration that capsules, time gaps between the spice and harmaloid dosage, over-dilution, improper acidification, irritation, and diet can negatively impact the consistency and quality of effects, so the best is often to mix the substances in salt form into a shot and take it all at once. One theory regarding the apparent effectiveness of this method is that a good portion of the substances is absorbed on the way down with the rest absorbed shortly thereafter, meaning that the stomach and intestines may not be the chief locations for absorption. This theory may also account for reports of the experience coming on in waves, rather than all at once.
For a preparation with goal of expedited pre-digestive absorption in mind, a small volume tincture utilizing absorption-promoting substances is ideal. Also, considering that the absorption will be far more localized than that of a brew-like preparation, the dosage may be greatly reduced to achieve effects of like magnitude. The advantages of such an end-result are multifarious, and with the consideration of further reducing the amount of spice needed, one may actually remove the more pure substances from a more full-range extract of jurema and set aside for other means of administration, leaving the analogous substances for sublingual use. In fact, reports indicate that it may be the analogs that most readily absorb through the oral mucosa, sublingual or otherwise.
Production of Spice Tinctures
For Spice Acetate:
- Add ~74mg/mL full-range freebase to the intended dropper bottle.
- Dissolve in distilled white vinegar (5% acetic acid), converting to an acetate salt, by shaking vigorously and submerging in a hot-water bath.
- Evaporate contents in a food-dehydrator at a temperature below 39°C, with the opened bottle stabilized as close to the fan as possible.
- Refill with either vinegar (ensuring a pH of 4, at most) or 50% glycerin/water in order to preserve the contents to prevent spoiling and as a tincture of known concentration.
For Spice Fumarate:
- Add ~86mg/mL full-range water-purified fumarates to the intended dropper bottle.
- Dissolve in 50% glycerin/water, by shaking vigorously and submerging in a hot-water bath.
- The resulting tincture will be ~66mg/mL of DMT and ~2.3mg/drop.
Dosage Character, Amounts and Ratios
It is often found that dosage are easier to measure and administer in the form of a tincture, whereby the number of drops can determine the amounts administered by the known concentration of the tincture.
- 30mg-40mg worth of full alkaloid spice acetate or fumarate, dry or in a concentrated tincture.
- >40mg THH to activate sublingual spice, 15mg-30mg to potentiate vaporized spice.
- 1:1-1:2 of spice to total harmaloids administered to activate sublingual spice.
- Less harmaloids necessary with use of stronger RIMA's like harmaline.
Maximizing Absorption by the Oral Mucosa
For powders and tinctures alike, it is necessary to maximize surface area contact while minimizing dilution by saliva. The most common manner of sublingual administration is to leave the powder in a pile or the tincture in a puddle and wait (often in some degree of agony) for 5min. while saliva continues to build, but this is unnecessary and inefficient. Spreading the agent as much as possible upon sublingual application will help to reduce burn common in the case of tinctures and to increase surface area contact. Following application, it is best to rapidly spread the agent with the bottom of the tongue to further maximize contact between the agent and the mucous membrane. Saliva must not be allowed to accumulate during administration, as so to avoid this, one should swallow any saliva before it has a chance to accumulate and do so as rapidly as possible. While swallowing the tincture or powder should be avoided as much as possible, with a reduced level of saliva in the mouth, any amount of the active agent that does make it into the throat (oropharynx) will absorb in that portion of the oral mucosa before ever reaching the rest of the digestive track.
- Apply thinly to reduce burn and increase surface area contact.
- Spread rapidly with the bottom of the tongue to maximize surface area contact and hasten absorption.
- Prevent dilution by taking measures to keep the mouth as dry as possible.
- dilution will result in hampering the contact between the active agent and the mucous membrane, as well as possibly washing it too far into the digestive tract to contribute significantly to the effects of mucosahuasca.
- To guarantee maximized effectiveness of administration, one should refrain from drinking any fluids too soon after administration.
- Tinctures should be applied in minimal sets of ~5-6 drops, but each set should be administered as rapidly as possible with the total dosage being administered within 1-2min.
Trichocereus and Its Associated Molecules
Psilocybes
Reference
- ↑ The FASA Method[1]
- ↑ Spice Extraction-The FASA Approach
- ↑ 69ron's D-Limonene Mescaline Extraction
- ↑ Jorkest's D-Limonene and Fumaric Acid Approach
- ↑ FASA Alteration of Final Purification
- ↑ Grinding Bark #15[2]
- ↑ Grinding Bark #18[3]
- ↑ Bubbler Bowl Variation of "The Machine"
- ↑ The Mini-Machine Bubbler Stem