 |
Note: | This page tracks the development of The Inspirator[1]. The content is to remain accurate as such. |
|
in·spi·ra·tor (ĭn'spə-rā'tər)
n.
- A device, such as a respirator or inhaler, by which a gas, vapor, or air is drawn in.
- One who inspires or motivates others.
[From Late Latin, from inspirare 'to inspire' (from in- + spirare 'to breathe') + -tor; cognate with, and possibly derived via, English or German]
|
The Inspirator was considered by its designer to be the criterion of efficiency for vaporizing spice, and to be a cheap and effective method of achieving sufficiently cool, full, measured doses. The device is inspired in part by The Machine but operates by convection heating--diffusing the heat through a ceramic heat-sink, in turn heating the airflow--rather than conduction. This design was the final evolution of The Mini-Machine Bubbler Stem, though has since been succeeded by The Inspirator mkII.
Procedure for Construction
|
Note: | Though this design is thought to minimize the possibility of exposure, SuperWool 607 HT should be used for health considerations, as ceramic fiber can be hazardous to the repiratory system. |
| Materials Required |
 |
Equipment:
- Butane Torch (same one that will be used for vaporization)
- Glass Dropper Stem (either from a pharmacy OTC or an online vendor)
- Ceramic Fiber (in any form, often found as blankets)
- Please use SuperWool 607 HT for health considerations.
- 1 Round Metal Screen or Faucet Aerator (as long as the metal doesn't burn or melt with the use of a butane torch)
- A Thin Metal Rod (even a paper clip would probably work)
- Safety Pin (long enough to punch holes through the plug)
- Pliers
- Rubber Gasket and/or Latex Tubing
|
|
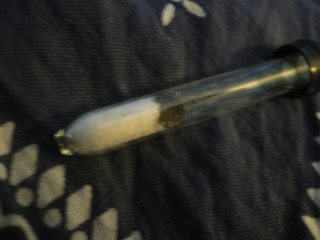 Close up of the heat intake. |
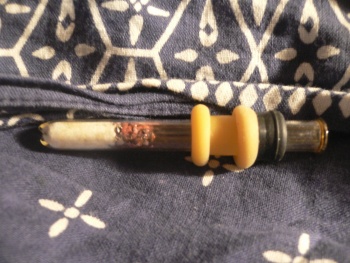
An alternative design w/ copper mesh.
- Carefully crush the nozzle of the dropper stem with pliers, leaving a slight portion of the nozzle's curve.
- be sure to wash out any lingering pieces of glass.
- Melt the broken end of the stem with a torch so that the sharp edges are dulled and any cracks sealed.
- Cut a segment of ceramic fiber, and use a thin metal rod to stuff it down toward the nozzle-end snuggly, and so that a part of the ceramic is exposed out of the heat intake.
- Ensure that the screen to be used is heat resistant by applying direct flame with the torch, and if smoke emits, continue to burn until no more can be observed.
- alternatively, a small metal mesh plug can be prepared from steel or copper scrub-pad in the same manner.
- this is the absolute highest temperature this piece will ever reach and will remain inert while in use.
- After it has cooled, use a chopstick or another cylindrical device thin enough to fit the inside of the dropper stem to apply pressure to the center of the screen while bending the edges up and around the device to mold it into a form that will fit snuggly in the stem.
- Carefully push the screen as snuggly as possible atop the ceramic fiber plug in the piece, working edges down between the glass and the plug.
- Fit two gaskets on the stem far enough from the plug to avoid heat but far enough from the other end to provide a stable stem.
- alternatively and more cheaply, a small section of latex tubing could be rolled or folded into a ring around the stem to serve the same purpose.
Calibration
| for Calibrating Airflow
|
 |
| NOTE |
 |
| Airflow is the key factor in ensuring the quality and effectiveness of the device. A properly calibrated Inspirator will vaporize perfectly with little to no subsequent maintenance.
|
|
- Using a thin metal rod or similar device, compress the screen and ceramic fiber plug by gradually and carefully working down the edges of the screen.
- Keep the screen stable and in place with the rod, and, with a safety pin, punch a hole through the plug from the intake of the piece to the screen, working the ceramic around to compress it to the sides in order to help it hold it's form.
- Remove the rod and use the safety pin to push the screen slightly off of the ceramic plug, and gently dig any remaining ceramic in the middle of the screen into the sides.
- To test the airflow, simply blow through the open-end of the piece, but the success of calibration can be more accurately gauged by seating in a bubbler and drawing air through.
- there should be some amount of pressure but no strain on the draw.
- The result of proper calibration will be rapid production of thick and cool vapor almost immediately upon heat application.
|
Administration.
| Use w/ Dry Freebase
|
|
| NOTE |
|
| This procedure works as well with one screen inserted as two.
|
|
- Place product into the open end of the stem and stuff down to the screen with a thin rod.
- Feather the glass with a torch until the product melts into the screen.
- Insert the stem into a bubbler as a bowl, with the open end in.
- Use a torch to apply heat to the exposed ceramic portion of the plug while drawing air through the bubbler.
- keeping some distance with the torch is recommended to avoiding burning or overheating.
- Only apply heat until a decent amount of vapor can be observed in the chamber, carb the bubbler immediately but briefly, and continue to apply heat and inhale in the same manner.
- once the device reaches a sufficient temperature, it will give off vapor rapidly and will not necessarily require continued heat application, but continue to heat periodically during the draw to ensure complete vaporization.
- if the vapor emits too slow or becomes harsh--either hot or burnt--this is due to inadequate airflow through the plug and must be calibrated with a safety pin for the device to operate properly.
|
| Use w/ Acetate Tincture
|
|
| NOTE |
|
| It is recommended that two screens be used for this procedure.
|
|
- A tincture may be produced specifically for vaporization by placing a known amount of freebase in a dropper bottle and diluting with distilled white vinegar (5% acetic acid), heating with a hot water bath and shaking vigorously, evaporating the contents of the dropper bottle and repeating until the contents are completely dissolved.
- currently 200mg/mL, yielding ~7mg/drop, is the recommended maximum concentration.
- oral use of a tincture produced in this manner is not recommended, due to the lack of a proper preservative
- The Inspirator may then be loaded with sets of 1-3 drops (recommended) followed by feathering the piece with a torch between sets and prior to usage in order to boil off excess water, as well as to dissociate acetic acid from the product to render a freebase.
- this will help prevent any tincture from running out of the piece, as well as to eliminate acid to improve the quality of the vapor.
- do not put the nozzle directly in the piece, as this will create a seal, resulting in positive pressure forcing some of the tincture out of the piece.
- Proceed with normal vaporization procedure as outlined in use with dry freebase.
|
Notes on Effective Use and Maintenance
| for Cleaning The Inspirator
|
|
- Attach a chemically resistant dropper bulb to the open end of the stem.
- Prepare a flask of cleaning solvent (IPA or acetone work best).
- Draw in the solvent and squirt out through the plug until sufficiently clean.
- actives may potentially be salvaged from cleaning solvent collected over time.
- Scrub with a q-tip.
- Carefully blow out remaining solvent.
- Feather the piece with a torch to aid in evaporating solvent and carefully apply the flame to the tip in order to burn any residual solvent.
- the tip will light up like a candle, so allow the flame to burn while feathering the glass with a torch to hasten the process.
- Scrub out moisture with the other end of the q-tip.
- Ensure the absence of residual solvent prior to use by smell and further flame application.
- Recalibrate the piece if necessary.
|
Storage
To ensure that the inspirator is clean prior to every use, it can be stored in a dropper bottle filled with IPA.
- Ensure the absence of IPA in the piece prior to usage by heating, burning and blowing the residual solvent out of the piece.
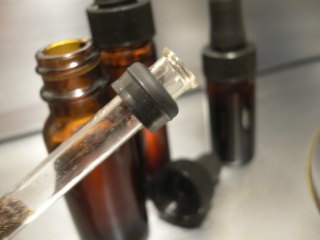
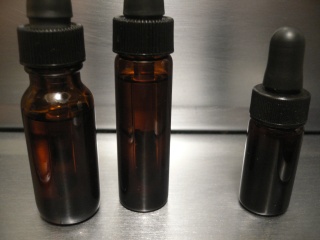 Two Inspirators stored in dropper bottles, preserved with IPA, along with a super-concentrated acetate spice tincture intended for vaporization. |
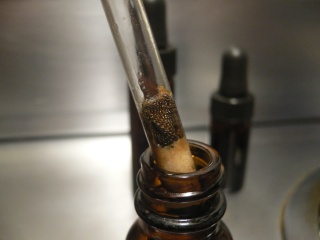 Inspirator removed from bottle. |
 With a little clearanc from the end, a gasket can fit snuggly in the bottle with the cap and dropper bottle in place. |
Further Tips
- Another handy method for storing the piece would be to cap the nozzle end with the dropper bulb in order to protect from breakage and keep track of the bulb to use when cleaning.
- A second gasket generally makes the piece safer to handle--especially if used as a pull stem--while the other provides a seal.
- For group sessions, it would be easiest to prepare an individual piece for each person so that dosage can be more easily regulated.
- When handling the piece after heating, handle by the gasket and avoid any part of the heated portion of the glass coming into any contact with hard surfaces.
- A good way to cool down a stem is to roll it rapidly between the palms, drawing the heat off the glass with one's hands.
- If the the nozzle end of the piece breaks off at any point, carefully push the plug to the other end of the piece when it has sufficiently cooled, heat the sharp edges until dulled, and push the plug back into place firmly, with a finger in place causing the plug to mushroom slightly until it fits snugly in place.
- Ensure adequate airflow through the piece by poking holes in the plug with a safety pin.
- Develop a relationship with the device.
Appendices
Special Thanks
- To Warrensaged for pioneering the use of a machine-style bowl with a bubbler.[2]
- To q21q21 and Bumber for inspiring the development of the progenitor of this method.[3]
- To q21q21 for developing his method of acetate to freebase spice conversion.[4][5]
Reference
- ↑ The Inspirator: a DIY convection heated vaporizer for use w/ bubblers by amor_fati
- ↑ Bubbler Bowl Variation of "The Machine"
- ↑ The Mini-Machine Bubbler Stem
- ↑ Acetates, the solution to all needs DMT.
- ↑ *PROOF* Freebasing acetates with only heat (to white crystals *pic*)


